
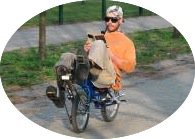

Többször felröppent már a fórumon a fa ülés ötlete. Szélvész Tanárúr nem volt rest, meg is csinálta a magáét. Az oldalán találtok képeket is róla. A száraz tények pedig:
- az ülés váza 10mm rétegelt lemez (állítólag nyír) max. 1000Ft
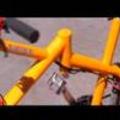
- a rudak 10mm átmérőjű bükk (Obiban 195Ft/1m 7db-ot használtunk fel)
- 25mm furatkp. távolság 1.1kg, de bőven le lehet menni 1kg alá
Az ötletet egy cseh srác, Jirka Hebeda írása adta (gépi fordítás itt). Szép hosszan ecseteli, hogyan is csinálta az ülést.
|
|


Felvettem vele a kapcsolatot emailben. Bár képeket nem tudott küldeni, nem volt rest még a fentinél is sokkal részletesebb leírást adni. Kiderült pl. az is, hogy később csinált egy második verziót is az ülésből. De ami a legfontosabb: minden probléma nélkül használta több ezer kilométeren keresztül a fa üléseit! Íme az email szövege (itt pedig a gépi fordítása):
Hello Peter,
It has been a long time since I did that seat, but I still remember the important parts.
For the shape of the main plywood plates you can use either the template from the link to the pdf or try your hand in your own design. The template in the link is more suitable for rather reclined positions, like a racing recumbent. If your seat is going to be more upright (bigger angle between the back of the seat and ground) I would recomend to make the bottom end of the seat slightly longer for more support (about 3cm I guess).
The most efficient way to make the seat was to cut the plywood ribs, hold them together using some clamps and drill the series of holes very close to the upper edge. I was using 10mm drill and then I put in 10mm thick circular wood sticks. It is best if you can get such size of stick and drill, that the stick can go into the hole but not very easily. If a little tapping using small hammer is required it is the best fit, because the seat will hold shape even before you glue it.
After I was happy with the dry assembly I put a drop of epoxy glue around every junction of wood stick with plywood rib.
To fasten the seat to the frame there are several ways. On the bottom end I was putting it to Azub bike, so I had the space between the ribs exactly 60mm. Then I only drilled a 6mm hole through them on the right place and used a long bolt to mount it where the standard fiberglass seat would go. On the top end I used some small block of wood like 25x25x60mm and two plates of plywood roughly 10cm long. The block went between the ribs of the seat and to strenghten the seat where the two support plates were mounted from outer sides of the ribs. The other end of these plates was bolted to the frame again. The whole thing is really dependent on the frame of the bike. Basically you need to bolt the ribs to the frame somewhere, if possible it is best to have it down in the middle of the seating area and up in the middle of the bend below your shoulders. You can adapt the dimension between the ribs before you use the glue and it does not have to be the same on top and bottom of the seat.
After short testing of the prototype you can see on that website I made a second one. It was a bit wider (25cm I think) and this time I simply painted the whole thing with laminating epoxy resin instead of glueing just the junctions - it served as both the glue and a very strong paint. This seat worked for several thousands kilometres until I sold it with the bike, then I don't know, maybe it is still in use. It proved to be more resilient than I expected. I only broke one stick when I crashed the bike once. The under seat handlebars of the Azub 4 had a system that allowed them to turn around a horizontal axis under the big force of an impact to save them from bending. They did this in the crash and went straight between two seat stick, one of them broke. Otherwise when the bike fell on the ground empty because of bad parking or small minor falls the seat never sustained any damage.
The last trick with designing this seat is the soft pad design. If you use some 50mm thick foam for example, the foam will be more supported at the places where sticks and ribs meet than it is supported at the ends of the sticks near edge of the seat. As a result it feels like the seat is thicker in the middle, which is uncomfortable and can make worse handling of the bike because you don't feel the bike so nicely. My solution making a four part seat pad. The bottom where I sit had just 50mm foam everywhere. The rest of the seat had 50mm foam stripes along edges, between ribs and edges. The remaining space covering the ribs and space between them had the foam cut down to just 30-35mm. All 4 pcs were held in place by some kind of fabric that looked like a net for fishing, the net was tightened in the back of the seat by some strings. This way the shape of the seat was really comfortable, ventilation was very good too. No maintenance was required during those first few thousands km.
I wish you good luck and a lot of fun with this seat design if you decide to make it. For a cheap and easy to make seat I think it is one of the best options. It may be no good if designed and built poorly, but it has potential to be very good if you hit everything right.
Best regards
Jirka Hebeda
Brno, Czech Republic


Utolsó kommentek